Sunday, 27 October 2013

Review/Haul: Luxola (Mario Badescu & Sigma)


Today I've got a mini mini haul from Luxola to share.

My sister was the one who introduced Luxola to me. She told me they have Deborah Lippmanns and they were having some birthday sale. I'll do a post on the Deborah Lippman nail polishes another day! But today, I'll be sharing about my experience shopping on Luxola and what I got from there.

From their "About Us" page, Luxola claims to be the "first online luxury cosmetic and skin-care site in South East Asia as well as the first to be 100% backed by every brand we work with, ensuring our customers are receiving authentic products each and every time they order." They are based in Singapore and they provide free shipping for orders above $10, and the fastest you can receive your buys is 1 business day. I think that's quite impressive!

The delivery team messaged me to say they will arrive in 30-45 minutes. I actually arranged for the delivery to be made to my house for my mom to collect. I was actually waiting for their message that day before calling my mom to inform her to watch out for them. Somehow, not everyone can correctly use our doorbell somehow and it doesn't always ring when people think they've pressed it. Some courier companies don't bother to call us and they leave if we don't answer the door immediately, even though we leave our door/window WIDE open to at least indicate that someone is at home. Back to my recount: Anyway, I happened to be busy that day and did not see the message and did not get to call my mom. When I finally saw their message, I also had 2 missed calls from the delivery person. Thankfully, my mom called and said she received it. So, thumbs up to the persistent delivery team.


Here's the bag my order came in. A little too big for the things I bought, but still nice to receive a nice bag. Only concern is that since it is not sealed, you should check your order when you receive it just in case something got lost along the way.


My sis and I got the "Drying Lotion & Buffering Lotion" set to share. Both are full sized. The price for the Buffering Lotion is $32, and Drying Lotion is $33. We bought them as a set and it was only $60. With the 25% discount, it was only $45. I think I saw them at Sephora for about $40+ each? Luxola is definitely more competitively priced.

My sister also got the E30 Pencil brush from Sigma Beauty. It retails on Luxola for $19.50. 

I got this drying lotion to try. I needed a new product to replace my benzoxyl peroxide, partly because I can no longer find the small sized version of it in Singapore. I thought I'll get this to try because I've read so much good reviews of this. I would not have purchased this at full price because my BP is cheaper than this and works well for me. I was excited when I got this until I saw this: 


 6M. 

This product is only good for 6 months after opening. I don't even think I can finish it in 6 months! I haven't seen anyone mention at all! Either no one takes note of these symbols, or this still works well after 6 months. I usually abide by them EXCEPT for nail polishes. Do you take note of these symbols?? Let me know! So if you're considering getting this, consider if its worth the price to cure 6 months of... erm, the amount of acne you have. I'll be trying out this product soon & hopefully it works like a miracle!!

Ingredients list:  Ingredients: Isopropyl Alcohol,Deionized Water (Aqua), Calamine, Camphor, Colloidal Sulfur, Salicylic Acid,Glycerine, Zinc Oxide, Titanium Dioxide, Talc

 
This drying lotion is for my sis. This is also only good for 6 months after opening. 

Ingredients list: Deionized Water,Isopropyl Alcohol,Sodium Sulfate, Zinc Oxide,Hydrolyzed Serum Protein, Hydrolyzed Yeast Protein,Pyridoxine, Niacinamide, Panthenol,Propylene Glycol, Allantoin, Biotin

 
& lastly, the E30 brush for my sis!

-- 

Overall, I'm satisfied with my purchases & experience with Luxola. Delivery was timely & fast, and they also bubble-wrapped the fragile items (the Mario Badescu Drying Lotion comes in a glass bottle). Definitely recommending everyone to check out that site. They have a good selection brands but I'm not familiar with a lot of them. Several brands are not that easily/commonly found in Singapore and the prices are quite competitive too. They also accept cash on delivery, so you can opt to pay only after receiving & checking the items.. For online shops, we aren't able to test the products before purchase, so I think it is very important to read up on reviews of the products before purchase. Luxola rewards customers to post reviews on the product pages and I think that's good because it encouraged people to post reviews & now there are a lot that you browse through before purchasing. I browse through the popular products and there are already a few that I may wanna try out in future. They occasionally have flash sales or just random sales... but usually a lot of the popular items get sold out really fast.. so be quick!

--

Disclaimer: I'm not paid to do this review. All views are my own. The links however, are affiliate links. You can support me if you use them to make a purchase :)

Sunday, 13 October 2013

Review: Innisfree Eco Nail Colour 1: 100, 101, 124, 121

100, 101, 121, 124

From left to right:
100 블루베리 제리 (Blueberry Jelly),
101 소녀의 땡땡이 스커트 (Girl's Polka Dot Skirt),
124 해피 바이러스 (Happy Virus),
121 빙글빙글 희전목마 (Round & Round the Merry-go-round).
I directly translated the Korean names so the english names are not the official names, but just what I translated with my super basic Korean. I'm most unsure about 121 so it's probably all wrong.

These are photos of the Innisfree nail polishes I bought from Korea earlier this year. SO PRETTY AREN'T THEY!! So chockful of glitter. These were really inexpensive. Innisfree Eco Nail colours are all 2,500 won each, for 10ml.

1) 100 블루베리 제리 (Blueberry Jelly)


The flakies are bronze/green, which are really pretty with the blue base. The flakies aren't very obvious. I do 3 thin coats for full opacity, but you can get away with 2. Great formula, no pooling, no uneven flakies or bald patches.


2) 101 소녀의 땡땡이 스커트 (Girl's Polka Dot Skirt) (aka dupe of Deborah Lippmann's Mermaid Dreams)

lol. I don't know if I slaughtered the name with my translation but isn't that what it is? Anyone with better korean skills please correct me if I'm wrong! I just think the name is a little weird because I don't see any association with a girl's polka dot skirt. Anyway, any nail polish lover will probably immediately think of Deborah Lippmann's Mermaid Dreams when you see this. I don't own that, but I've seen photos of them online and they are practically dupes! And this is only one-tenth of the price of a Deborah Lippmann. I almost didn't want to get this because my sis was already getting a bottle. But she asked me why wasn't I getting it, and she convinced me to get another bottle! Well, it is pretty inexpensive so that's okay. I don't wear glitters that often but I really like this after wearing it on my nails. This polish is from the Poem Nail collection.

Formula wise: Great. I'm beginning to love the formula of these Innisfree nail polishes. These are my firsts. The glitters aren't big, so you won't have problem getting them evenly on your nails. Just like before, 3 thin coats for full opacity, but 2 coats is good enough!


3) 124 해피 바이러스 (Happy Virus)


I was probably most excited to get this when I first got to the nail polish counter. Blue is still my favourite nail colour. These have purple square glitters, silver hexagon glitters, smaller white hexagons, and tiny white dots. The glitters are harder to get on the nail, probably because they are bigger. You'll need to dab them on. I had trouble getting them evenly on all nails. Some nails I dabbed more, some less... but overall I still love this polish! Application-wise, it isn't my favourite out of these 4, but this is my favourite polish out of these 4 and I'm probably more likely to wear this more often.


4) 121 빙글빙글 희전목마 (Round & Round the Merry-go-round)


I love this! I mentioned before that I don't like glitter polishes that much, unless it is in a opaque base. I like how the layers of polish semi-cover the glitters in the previous layer. There are square glitters, hexagon glitters, and tiny glitters in a milky base. I like the combination of colours in this polish. The big glitters are harder to apply and you need to use the dabbing method to get more glitter and get them even. (but it isn't as bad as 124) The base isn't very opaque, so this needs 3 coats. I dab a little more at the nail line to cover it. You could probably first cover your nail line with a layer of white polish first. 

And... another photo, just because: 


Swatches on nail wheel: 


These are without topcoat.

As you can tell, the flakies on 100 isn't that obvious, but I also can't seem to capture it properly on camera. It is more obvious in real life than in these photos though.

--

Overall, for the price, I think they are really good polishes to own. Probably my favourite korean brand for nail polishes right now. They also have a selection of gel nail polishes. My mom actually has one but I've yet to borrow to try. I forgot to take a photo of the brush, but they are comparable to the size of OPI.

Innisfree Eco Nail colours are 4 free: DBP-free, DFHP-free, Toluene-free, Formaldehyde-free. I'm not sure if all colours are 4-free because it isn't stated on all the pages... You can read more about toxic ingredients in nail polishes here by googling DBP, Toluene and Formaldehyde in nail polishes.

For korean nail polishes, I find it a bit harder to find out whether they are 3-free. At least it is stated on Innisfree's page. That makes me more self-assured. Sometimes I wanna ask the sales assistants in store, but I'm not sure if they will be aware... I'll probably ask the next time I remember....

I've got more Innisfree nail polishes to review soon. Meanwhile, if you've got any favourite korean nail polish brand, leave a comment & share! :)

Wednesday, 9 October 2013

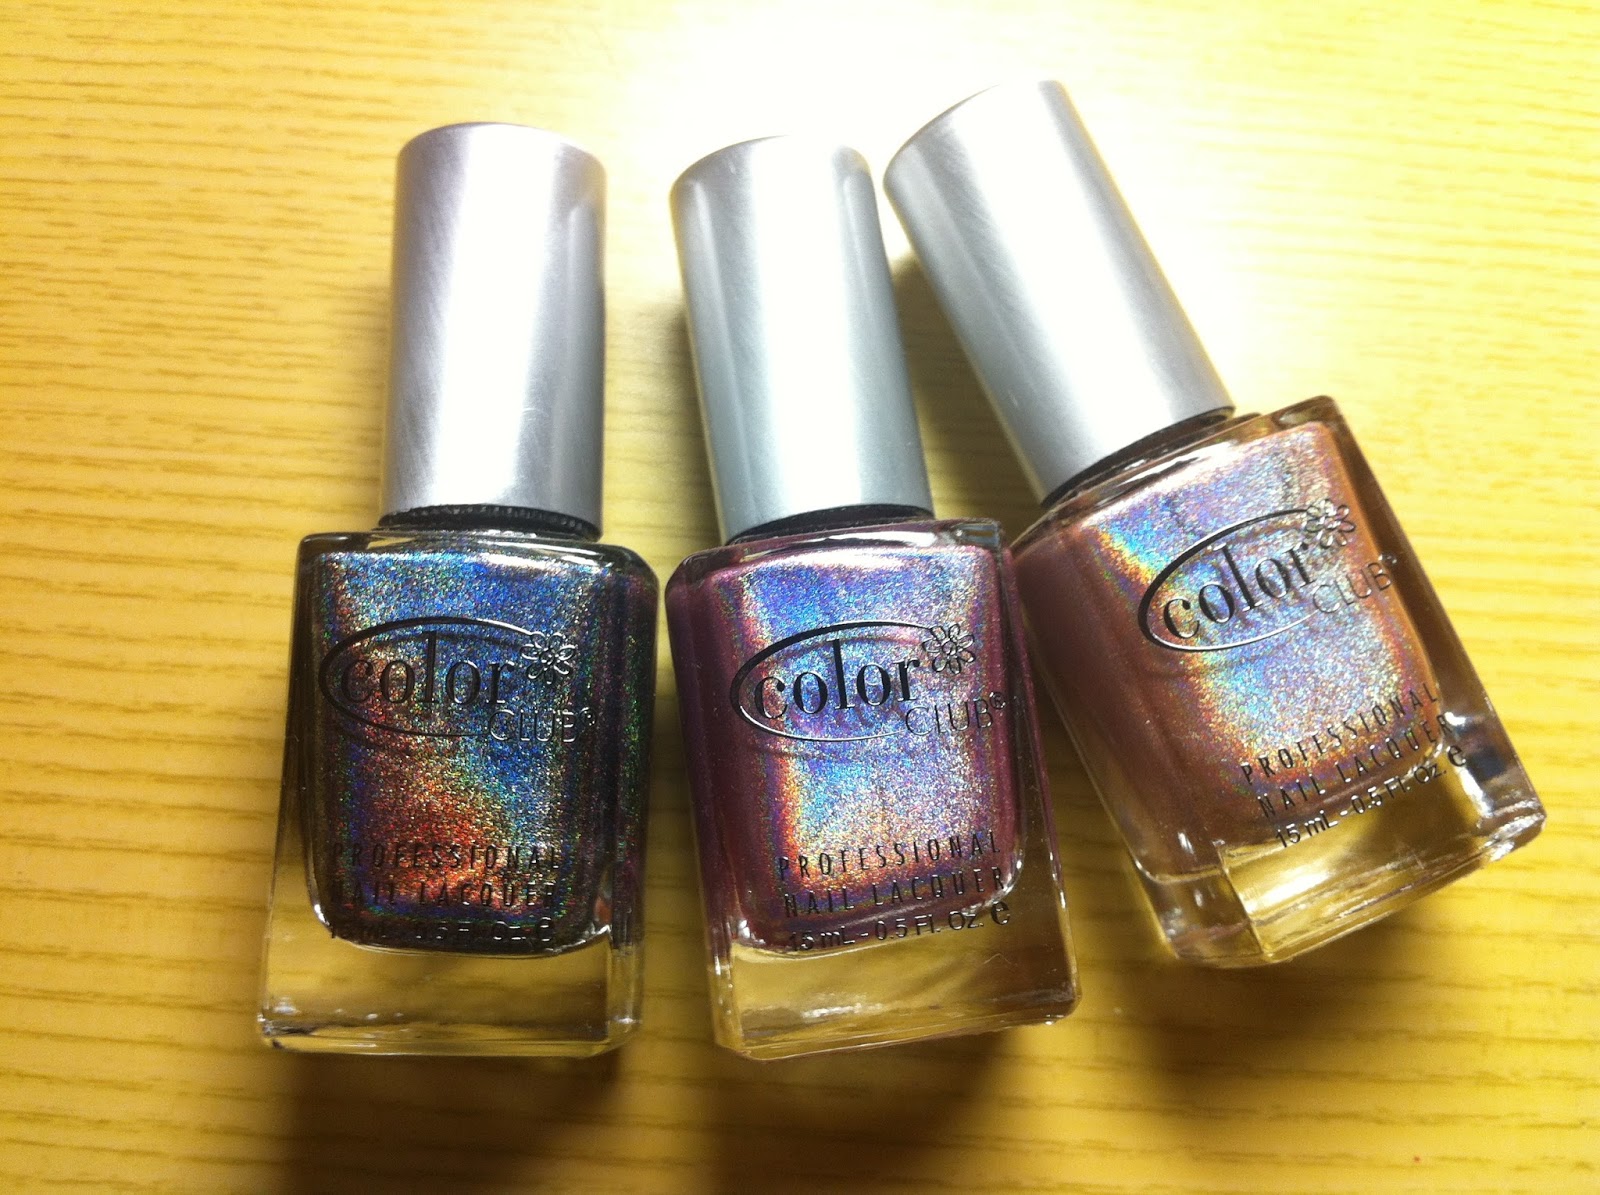
Color Club Holographic Nail Polishes: Cherubic, Halo-Graphic, Beyond

Color Club Cherubic, Halo-Graphic, Beyond

Today, I have some photos of my Color Club Holographic nail polish collection! 
Well, just three.

Holographic nail polishes aren't what I usually reach for, but these were too pretty to resist! I've been considering these for a long time and they were on promotion! These are the only shades I can see myself wearing. I definitely won't be able to pull off a say, blue or green holographic polish on my nails.

Indoors, under lamp
Color Club Beyond, Halo-Graphic, Cherubic
Can you see the holo-ness!! Pictures really don't do justice. 

Color Club Cherubic, Halo-Graphic, Beyond
They are a lot more holo in real life. I promise!

And more bottle shots, just because:
(These were taken indoors with sunlight, but you can still see the holographic-awesomeness. Most holos disappear under the sun. These are more subtle than indoor artificial lights, but I like it this way.

Color Club Cherubic

Color Club Halo-Graphic

Color Club Beyond

Macro (sorta) of Color Club Beyond

My thoughts:

The formula on these were good. No goopyness, easy application, no streaky-ness.
I remember a few years ago I was looking at getting Nfu.Oh halographic or some other brands, but they required the aqua base coat. That was one thing that held me back... Why will I want to buy a special base coat just for a particular polish? Then I never considered getting holographic nail polishes again. Until now!
These Color Club holographic nail polishes apply well on my regular base coat (use Seche Clear) and I did not have any application problems at all. They were also opaque in 2 coats.

I love Cherubic because it is such a pretty colour. I think anyone will be able to carry it off. If you're holding off holographics on your nail because you don't like it being so attention-seeking (me!), you may like Cherubic. I also LOVE Beyond. I actually added these to my order at the very last minute. I already owned Color Club Revvvolution which is also a black holographic but I read that these were MORE holo and I bit the bullet and bought it --- no regrets. I see myself wearing these two more than Halo-graphic, to be honest.

Overall, I love these polishes. All 3 are equally holo and so pretty when the light hits them. For this price, it is definitely a good deal. I'm very satisfied with them!


Monday, 30 September 2013

Review: Peach Stem Cell Vitamin A Facial Mask by Watsons


I usually only make & post reviews if I've used the product for a long time and I'm sure of its results. But I thought I'll just post a short review on this! Watsons was giving out complimentary masks on their instagram a while ago and I managed to get one! This is quite a new product. I am a believer of masks, whatever that means, and so I thought it'll be good to try a new brand. 

To be honest, the chance of me randomly picking this up from the stores myself to try is really low. There are WAY too many masks out there and to try a new brand, that is a house brand is not something I would do! So I'm glad to have a chance to try these. 

Reading the packaging, I was quite impressed. 
"Made in Korea"
"Free of Parabens, Alcohol & Lanolin"

Some things I've noted: 
  1. Upon opening the package, I find a very crumpled sheet mask inside, like it has slipped down to the bottom. Sounds bad, but actually it doesn't really matter if the product is good right? It doesn't come with a plastic to hold up the shape & help you to peel off & apply the mask easily. Innisfree's sheet masks also don't come with a plastic, but it isn't crumpled nor do they slip in the packaging. This Watsons mask wasn't as easy to apply as Taiwan's popular My Beauty Diary masks. To me, that is still one of the most easy-to-apply masks.  
  2. It wasn't dripping with the essence -- good for application, but bad if you think that means there is less essence? 
  3. A lot of 'cuts' on the masks to help fit your face better. Some cuts are also pretty "deep". That's a good thing I suppose, but I didn't really like it because it made the mask more 'vulnerable' to tears especially since I had to 'uncrumple' the mask to put it on (see point 1). I took time to be careful but I still got a tear at the nose. Nvm, I'll just "paste" it back to my face!
  4. Thick sheet. I read somewhere that the thinner the sheet mask, the better because your skin can absorb the essence better. I'm not sure about that. This is definitely noticeably thicker than others I've tried.
  5. Nice fragrance. 
Oh dear, does that sound like a bad review? Neutral?? But honestly it wasn't that bad. After I removed it, 'massage' a little, it absorbed pretty well and didn't leave any icky sticky residue on my face. I think its still a pretty decent mask to try out. My biggest complain is only the application part. Up til now, I still like MBD's sheet mask's ease of application. It was quite annoying to have to 'un-crumple' the mask and find where the eyes, mouth holes are, especially when the mask is already susceptible to tears. The 'cuts' on the mask were to give a good fit, but it was susceptible to tears too. I don't know if I just got a bad pack with a crumpled mask, but if they fix that, I think this mask will be okay. I would recommend you to try it if you're looking for a masks that fits your face well. 

Will I get this again? hmm... for the price, maybe no. Maybe when they have a promotion!

Here are more info on the packaging: 


What is "bee venom" anyway.. 


Have you tried this product? Was your mask 'crumpled' up like mine?

Sunday, 22 September 2013

How to post videos from camera to instagram

I took a video with my camera but I also wanted to share it on instagram. If you wanna post videos onto instagram, you gotta save the video in your iphone's camera roll right? So that means we gotta do 2 things:
1) Convert/Trim video
2) Transfer/save onto iphone's camera rol
l
***
Before I start my noob-ish tutorial (I'm sure there are some other ways to do this rather than my way, but idk, maybe this is what you're looking for), I have to say that there are several other softwares/programs other than those that I've mentioned that can do the same thing. I'm sure you know what you have so just play around and see if you can do the same thing. All the programs/apps I used are all free to download, or were already installed on my laptop.
***

1) Converting/trimming the video 
I trimmed the video with Windows Live Movie Maker (what! don't judge). It's pretty straighfoward: just click "view" and then "trim". You don't have to trim it to exactly 15seconds, just short enough for the file size to be not too big, but still have the part you want to post (ok, obviously..). WLMM only saves in .WMV format, so i just saved the file, opened it in Quicktime and saved it again as .MOV. (ok i'm actually not sure if i have to convert it to .mov, but i just did it because its fast to save and better than wasting the time to find out if i have to convert.)

Note: Video need not be in 1:1/square format. I saved the file in 640x480.

2) Transfer/save onto iphone's camera roll
I saved the video onto my dropbox on my laptop, which allows me to access the file on my iphone. Another alternative way is to email yourself, but I didn't try that. The syncing time is pretty fast since the file size was pretty small (18mb). When you open the file on the dropbox app on your iphone, you'll realise that the "save to" icon is greyed and you can't click it. What I did was to "favourite" the file. The app will then take some time to download the video for "offline viewing". You can view the progress on the "Favourites" tab. Once its done downloading, you'll find that you can now click the previously greyed out icon! If you click that, there will be an option "Save to Camera Roll". Save it, and then you can now access instagram and post the video from your camera roll!

Note: The app didn't crop my video to a square format, but it had the black bars. It didn't matter to me.

Yeah, there you have it. My tutorial. I've already said it's gonna be noob-ish. I just figured this out on my own and played around and this is how I managed to post a video from my camera to instagram! Hope this helps someone... If you have any questions -- don't ask, because I won't be able to answer you. HAHA. I really don't think I can! I didn't go figure out about the video format, audio, file size, resolution etc... I just clicked around and found that this worked for me. Maybe I took some extra steps but I can't really be bothered to find out other proper ways to do it because this was pretty fast & simple for me to do with apps/programs I already had. There's probably some shortcut or better way to do that, but I'll leave you to google it for yourself.

k bye.

Sunday, 25 August 2013

Review: Innisfree Beads Nail Kit

I got the Innisfree Beads Nail Kit (#1) on my Gmarket haul from Korea. I got to try it recently and I'm quite impressed by it!!

Innisfree Beads Nail Kit #1

The retail price is 10,000 won, but I got it on sale at 8,000 won. The other regular eco nail polishes were on sale for half price at 1,250 won and this seemed expensive and I almost didn't order it until my sis asked why I wasn't getting it. Then I realised 8,000 won for this kit was actually a good price! Thank goodness I got it, it was really worth the price! :)

Instructions
They also have instructions on how to apply the nail beads. Although I took Korean lessons in uni, I'm not at the level to be able to understand the instructions.... Ha. The illustrations are quite self-explantory except for the last step. It says something like after 10-15 minutes... something something top coat. haha. I guess that means after 10-15 minutes, apply top coat? But the after applying the top coat, the colour of the beads faded a little. But that's okay, because it only makes it look more pastel.

*Purple is slightly more pink than pictured

What you get in the kit! 10g of nail polish, and 6g of nail beads. How pretty are the beads!!!! The kit comes with a little plastic funnel. It's thinner than I imagined, but it serves its purpose anyway!!


Oh yes, I didn't take a photo, but the opening of the beads bottle is the same as the nail polish. Don't worry about the beads all spilling out when you are applying. The beads only come out in small quantities when I tap the bottle, so there wasn't really much to clean up. What I did was to pick up the extra beads with my fingertip and scraped my finger against the edge of the funnel. It was a lot of fun re-bottling the excess beads.

Awesome close up of the beads
Blue, purple and pink! I like the combination. They also had another kit with blue base and blue beads. Usually, I would pick blue over purple, but I like the colours of the purple beads more.

The beads are slightly bigger than other brands that I've seen, like Ciate & Catrice. They are not as tiny as the caviar nails.

Bottle label. Made in Korea. PVC beads.

Application: 
The purple base nail polish had a great formula -- pigmented and smooth. It wasn't particularly glossy on its own. The beads were easy to apply; it didn't take a long time. I did other things before applying the top coat and the beads were falling off. The top coat definitely helps to hold the beads together. I would recommend using a top coat that's less thick and more watery, just so that the texture of the beads will not be covered. I also dabbed the sides of the beads with some topcoat so that they would be less likely to drop off. 

Removal: 
After several days of wear, I picked at the sides of the beads and they came off pretty easily because the top coat still held the beads together. 


Here are some additional photos I took with my phone: 


The purple is closer to this shade. It is more pink than it is blue. 


 Swatch: 


And... Swatches on my hand. I wasn't planning to post these because my nails were in a bad shape after using a particular nail polish from another korean brand which I'll be ranting about soon.... or never. I planned to apply the beads on 2 nails, but I was unsure whether the beads would stay on well... and I was lazy to have to "tend" to the beads. But my worries were unfounded. 
Side note: I think these beads are best only applied on 2 nails. I think its a little too much to have them on all nails. Like I mentioned, the beads are slightly bigger than the usual caviar nails. I would wear the beads on my middle & ring finger. 


AND. A super blurry photo (which I wasn't planning to post too) to show the wear. I actually wore this mani over the holidays and I did A LOT of spring cleaning with these nails. I was lifting my heavy mattress, vacuuming, moving things around and I also washed my hair (which I thought for sure the beads will drop out), but NOPE. By the end of 5 days, 99% of the beads were still on. I only had 3 or 4 missing beads. AND. Even the nails with no beads had no chip/wear. Cheap and good. sigh. 


To end off, here's the link to the product page. There are more photos and (I just realised) a video on application. Here's also someone's pictures & review on the blue version. I also tried to read the reviews on the product page and it seems like they are negative reviews! But alas, my limited korean vocabulary.... 

(*if you are viewing on mobile, you may have to change to the desktop version to see the links)

Thursday, 22 August 2013

I've got some posts in my drafts. Mainly some Innisfree nail polishes! 
Also... I probably won't be able to review the Innisfree Jeju Volcanic Black Head Out Balm.... because I have no blackheads??? I thought I would... like... accumulate some blackheads (LOL) and then try the product but I don't have much blackheads these days!! WHY? One of the products I'm using now must be working wonders...